 What robotics project doesn’t need eyes? By eyes we’re referring to HC-SR04 Ultrasonic Sensors. We have put together a quick and easy library to get started with using these sensors.
The HC-SR04 is a low cost, easy to use sensor that will measure distance by bouncing ultrasonic sound waves off of obstacles in front of it. Ideal applications for the HC-SR04 is using them for obstacle avoidance systems in your robots/RC cars – This will be quite short post as there isn’t much to it.
So, what’s needed?
- An Arduino
- HC-SR04 Ultrasonic Sensor
- Our HC-SR04 Ultrasonic Arduino Library
That’s all that’s needed to get started. The sketch we used as an example below will measure the distance of the obstacle in front of the sensor and if there is a distance greater than 5 inches it will turn on the on-board LED on the Arduino (Pin 13). The datasheet for the HC-SR04 is linked in the above list.
Download the above Library and place it in your Arduino > Libraries folder. Or you can copy/paste the below code into files yourself (see below for code, call the folder HCSR04).
It is worth noting that this library is based on a basic example by 4tronix except this wraps it up into a library and makes it easy to use multiple how to buy lorazepam online uk sensors at once, with minimal code.
Now that you’ve got the library, either downloaded or by copying the above code. You can use it with just three lines of code in your Arduino sketch. See below for the example (this turns on the on-board LED if the distance is greater than 5 inches)
As you can see, you first include the library and then declare a new instance of the class. The first parameter is the Trigger Pin and the second parameter is the Echo Pin that you have the Ultrasonic connected to.
You can then call the trigger() function and get the distances in Inches and CM – Calling the distanceInches() and distanceCM() functions does not re-query the sensor, you need to use the trigger function to refresh the values.
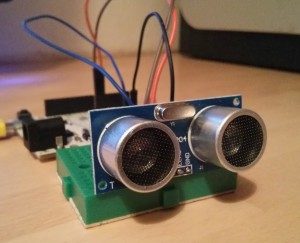
There is an example photo on the right hand side, this shows the Arduino connected to a mini-breadboard with the HC-SR04 sensor attached.
The HC-SR04 has only 4 pins to connect: GND, ECHO, TRIG and VCC– Make sure to update the pin allocations in the above code if you’re not using 6 and 7.
That’s all there is to it. I’ll mention that there are other libraries out there with more time spent on them as well as support for more ultrasonic sensor models, but this should get you going with the sensor for now.